-

planning
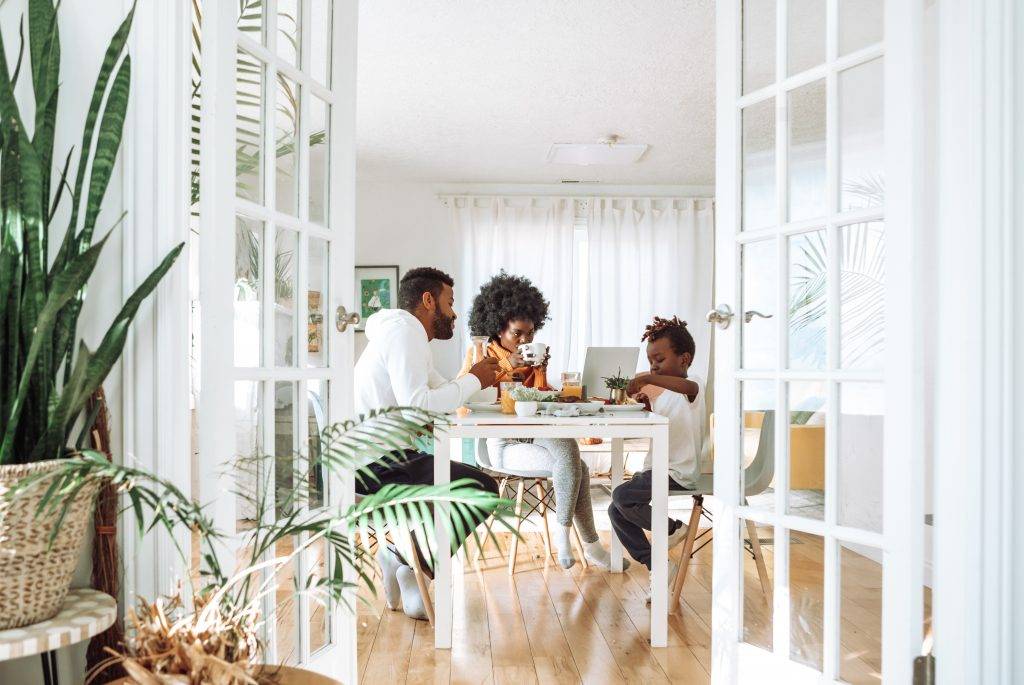
Second Storey Additions for Multigenerational Families
In today’s ever-changing world, it’s not uncommon to see multigenerational families living under one roof. Whether it’s to share costs, provide convenient babysitting options, or leverage the strengths of different generations, more and more families are embracing the benefits of multigenerational living. One solution that has become increasingly popular in catering to growing families is the addition of a second storey to the family home. In this blog post, we’ll explore how multigenerational families are capitalising on second storey additions to accommodate their expanding needs and enjoy a host of advantages that come with this choice.
Shared Costs:
One of the primary reasons why multigenerational families are turning to second storey additions is the significant cost savings that can be achieved. The initial investment in expanding your home may seem daunting, but when you consider the long-term benefits, it becomes a wise financial decision. By adding a second storey, families can effectively double their living space without incurring the astronomical expenses of relocating to a larger home. The costs of a second storey addition can often be shared among the family members, making it a financially sustainable solution for everyone involved.
No Need to Move:
Moving to a new home can be a stressful and expensive endeavor. It often means uprooting your family, leaving behind a familiar neighborhood, and adapting to a new environment. With a second storey addition, you can avoid all these hassles. You get to stay in the place you’ve called home, maintain your connections with the community, and preserve the memories associated with your existing house. The continuity and stability that come with not having to move are especially important for children and seniors in the family.
Built-In Babysitting:
One of the many advantages of multigenerational living is the availability of built-in babysitters. Grandparents, aunts, uncles, and older siblings can provide childcare when needed, allowing parents to take some well-deserved time for themselves. With a second storey addition, you can create a designated space for the older generation to stay comfortably while ensuring privacy and convenience for everyone. This arrangement is a win-win for both childcare and bonding among family members.
Leveraging Multigenerational Parenting Styles:
Each generation brings its unique parenting styles and experiences to the table. Multigenerational living allows for the exchange of wisdom, knowledge, and different approaches to parenting. A second storey addition can provide separate living spaces for each generation, which is vital for maintaining a sense of independence while still benefiting from the collective family support system. This dynamic can result in a holistic approach to childcare and child-rearing that enhances the well-being and development of the younger generation.
Build a Second Storey Addition today:
Multigenerational families are discovering the myriad of benefits of second storey additions in accommodating their growing households. These additions offer the advantages of shared costs, the convenience of not having to move, built-in babysitting, and the opportunity to leverage multigenerational parenting styles. By choosing to expand upward instead of outward, families can create a harmonious living environment that fosters both togetherness and individuality. If you’re part of a multigenerational family looking to capitalise on the benefits of second storey additions, it’s essential to consult with experts like 32 Degrees Building to help make your vision a reality. Embracing multigenerational living can bring joy, financial relief, and a stronger sense of unity to your family.
Preparing for Your Second Storey Addition: A Comprehensive Guide
Are you gearing up for an exciting second storey addition to your home? It’s a big project that promises a beautiful transformation of your living space. But before the construction can begin, there are some essential preparations you should make to ensure a smooth and stress-free process. In this blog post, we’ll walk you through the necessary steps to get your home ready for the upcoming second storey addition build.
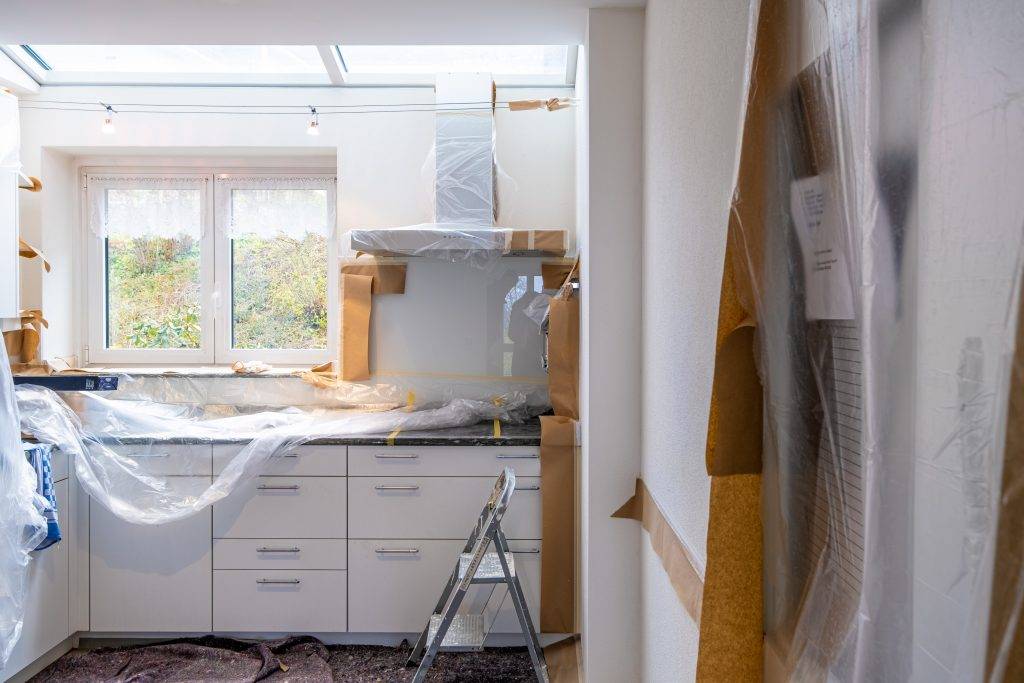
1. Clear the Ground Floor: Before the construction begins, it’s crucial to clear out your ground floor. Move any furniture, belongings, or clutter that might get in the way of the builders. Additionally, if there are any large or valuable items that you can’t relocate, cover them with tarps to protect them from dust and debris. This step is essential to provide the builders with a clean and unobstructed workspace.
2. Invest in an Air Purifier: Construction can be a dusty affair, even with the most diligent cleanup efforts. To help combat the dust generated during the second storey addition build, consider investing in an air purifier. This device will improve air quality in your home, making it more comfortable to live in during the construction process. It’s a small investment that can make a big difference in maintaining a healthy living environment. It is also to be prepared for the fact that post-construction you will still have dust settling.
3. Prepare Your Garden: If you have an outdoor garden or patio area, make sure to prepare it for the upcoming construction. Remove any garden items, such as hoses, outdoor furniture, and potted plants, and store them safely. This will ensure that your outdoor space remains free of damage and clutter during the build.
4. Scaffolding Considerations: Scaffolding will be erected around the perimeter of your home as part of the construction process. To facilitate this, it’s essential to clear the area around your house. Remove any external items, including tables, chairs, and any other outdoor equipment. This not only ensures a safe construction environment but also makes the work more efficient.
5. Protect Your Personal Items: While the builders will take every precaution to protect your home, it’s wise to safeguard your personal belongings. Remove and safely store items like televisions, artwork, and decorations. Additionally, take down any pictures or artwork hanging on your walls. These precautions will minimize the risk of damage to your cherished possessions.
Preparation is key when embarking on a second storey addition to your home. By following these essential steps, you’ll create a safe and efficient environment for the construction team, protect your belongings from dust and damage, and ensure a smoother building process. With the right preparations, your second storey addition will be a seamless and exciting home improvement project. At 32 Degrees Building, we’re dedicated to helping you transform your house into your dream home. Contact us today to discuss your project and make your vision a reality!
Building Your Dream Home: Plans First or Builder First?
When embarking on a Second Storey Addition, Ground Floor Extension or Large Scale Renovation project, one of the critical decisions you’ll face is whether to start with architectural plans or consult a builder first. It’s a topic that often divides opinions, with some advocating for plans first and others for the builder-first approach. At 32 Degrees Building, we believe that choosing the builder-first approach can save you time, money, and unnecessary headaches down the road. In this blog, we’ll explore why it might be in your best interest to consult a builder before diving into architectural plans.
1. The Budget-Conscious Approach: One of the initial concerns when starting any construction project is budgeting. Will your dream design align with your financial resources? Architects are experts at creating beautiful designs, but they might not fully understand your budget constraints. By approaching a builder first, you can get an accurate quotation upfront, allowing you to make informed decisions about your project’s scope and financial feasibility.
2. Realistic Cost Assessment: Builders are well-versed in construction costs, market trends, and material expenses. When you consult a builder first, you tap into their expertise. They can provide valuable insights into cost-effective design choices and suggest alternatives that can save you money without sacrificing your vision.
3. Holistic Project Management: Opting for a builder-first approach means you’re not just receiving a quote. You’re partnering with professionals who can handle the preliminary aspects of your project, including architectural plans, engineering, and approval processes. This holistic approach saves you time, money, and the stress of coordinating various services independently.
4. Avoiding Costly Redesigns: Imagine spending a significant sum on independent architectural plans, only to discover that they don’t fit your budget or your vision needs adjustments. The cost of revisions or a complete redesign can be substantial. When you consult a builder first, they will work with you on your plans early on and provide valuable feedback, helping you avoid expensive changes later in the process.
5. Standard Preliminaries Simplified: At 32 Degrees Building, we offer a comprehensive preliminary service that covers all essential aspects of your project, such as architectural plans, surveys, BASIX compliance, environmental assessments, waste management planning, external colour scheduling, structural adequacy certificates, engineering plans, stormwater plans, Sydney Water Tap-In Approval, and assistance with the application process to Council or Certifier. Our bundled service not only streamlines the process but also offers cost savings compared to sourcing these services independently.
6. Cost Efficiency: Contrary to popular belief, obtaining preliminary services independently may not save you money. Our integrated package is designed to be more cost-effective while ensuring that all necessary aspects are handled efficiently.
Conclusion: In the pursuit of your dream home, the choice between plans first or builder first can significantly impact your project’s success. At 32 Degrees Building, we advocate for the builder-first approach, which provides you with a realistic cost assessment, holistic project management, and valuable insights to align your vision with your budget. Our comprehensive preliminary service simplifies the process and offers cost-efficiency.
To learn more about how our builder-first approach can benefit your second-storey addition, ground floor extension, or large-scale renovation, please contact us. We’re here to help you turn your dream home into a reality while keeping your project on track and within budget.
How do I know if my home has been built properly?
At the front of mind for the majority of homeowners entering into any building project, is the question of how to know whether the works they have started have been built with care, are within specifications and comply with the rules and regulations and have ultimately been built properly.
It is important to understand the process, stages, checks and requirements each build goes through and we’ve put together some information to help explain the process and the different stakeholders involved and their key role in your build;
These can be broken down as follows:
- Principal Certifying Authority (PCA);
- Engineer;
- Builder;
- Quality Assurance Program;
- Certificates;
- Defect Period.
- Statutory Warranty Period
Principal Certifying Authority (PCA)
A Principal Certifier is engaged to carry out mandatory inspections associated with a build during the construction process. They are there to ensure the structure is completed in accordance with the approved consent (DA/CC or CDC), as well as to check compliance with the Building Code of Australia (BCA) requirements
Generally for a second storey addition, the mandatory inspections that the Certifier will undertake during the build may look like this:
– After excavation for and prior to the placement of any footings
– Prior to pouring any in-situ reinforced concrete building element
– Prior to covering of the framework for any floor, wall, roof, or other building element
– Prior to covering waterproofing in any wet areas
– Prior to covering any stormwater drainage connections
– After the building work has been completed & prior to any Occupation Certificate being issued in relation to the building
Upon completion of mandatory inspections, completion of all works associated with the approval and final documents/certificates provided, an Occupation Certificate will be issued.
Engineer
A structural design plan is generally prepared by registered professional engineers, and, are based on information provided by the architectural drawings. They provide details for how a building or other structure will be built.
It is not uncommon for engineering revisions to occur during the build following onsite inspections by the engineer and consultation with the project manager. The engineer is there to confirm that the structure has been built in accordance with his plans and certifies the overall structural adequacy of the build. This certificate is provided to the Certifier.
Inspections undertaken by engineers may look like this;
– Prior to pouring any in-situ reinforced concrete building element
– Prior to covering of the framework for any floor, wall, roof, or other building element
– Prior to covering any stormwater drainage connections (if required – based upon the hydraulic design)
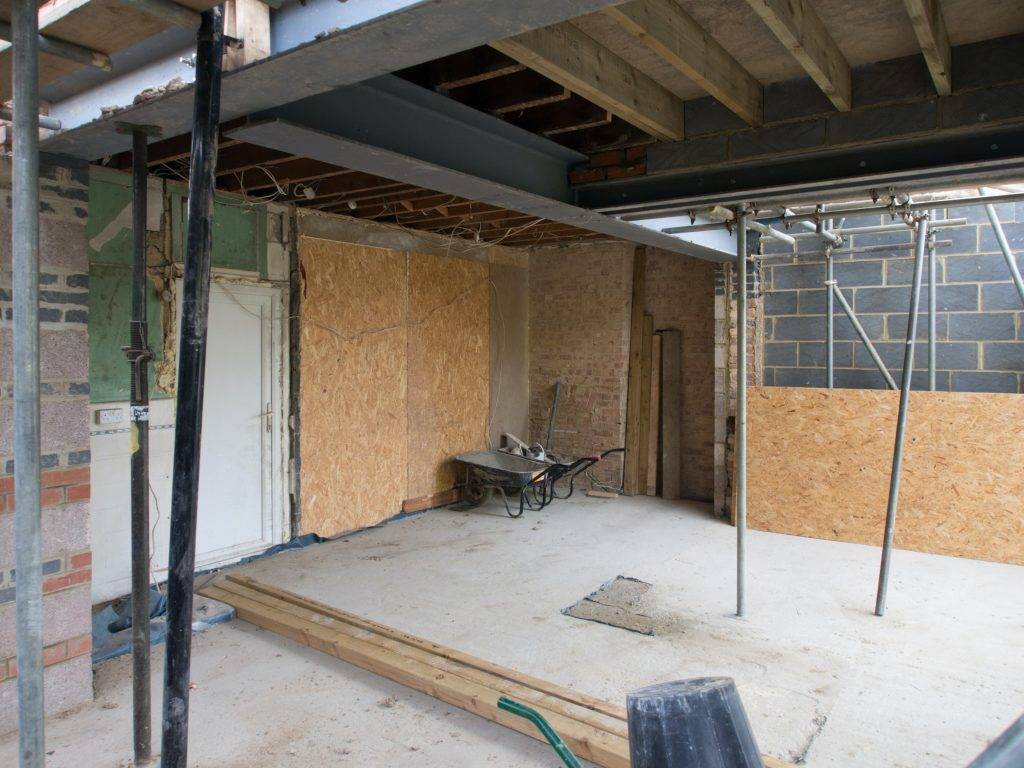
Builder
The role of the builder is to interpret the architectural drawings, structural drawings, surveys plan and all approved documentation and construct the building in accordance with these. The builder will then coordinate, schedule and oversee the multiple skilled trades to undertake each component of the build and then liaise and coordinate the inspections with the engineer and certifier during the build at critical stages to confirm compliance with the BCA and that the build is structurally sound.
There are multiple trades, suppliers and deliveries to be managed by your builder during a build. To name a few of the trades that would work on your home; carpenters, plasterers, concreters, brick layers, plumbers, welders, electricians, waterproofers, roofers, tilers, labourers, cabinet makers, showerscreen installers, glaziers, staircase installers, painters, flooring installers, insulation installers, asbestos removalists, air conditioning installers, renderers.
Your builder should be able to provide you with a copy of the timeline of your build but don’t be alarmed if dates change during your build with certain items – this is normal, given the multiple trades and deliveries happening! As long as your builder is within your contract period, you only need to focus on your finish date and ensuring that any materials you have to supply are onsite by the date communicated to you. Should you have any concerns with your finish date being on track, just reach out to your builder and their team for clarification. They are there to help.
Quality Assurance Program
As you can see the roles of the builder, engineer and Certifier do a lot to ensure your build is completed in compliance with the BCA and the approved plans, sometimes, it can be easy to overlook the minor items during the build and this is where our quality assurance program steps in. As an additional check across all of our builds, we arrange for an independent building inspector to complete a progress inspection at the Lock up and Rough in stage and a final inspection pre-handover.
This is an added layer of reassurance for us and our clients to ensure you are receiving the highest quality build.
Certificates
Following Practical Completion, certificates are provided to the certifier.
These are from the individual trades to certify their work has been completed in compliance with the Australian Standards.
Certificates required but not limited to:
– Engineering structural adequacy certificate
– Waterproofing certificate for each wet area
– Insulation certificate
– Glazing certificate
– Electricians CCEW certificate
– Smoke alarm certificate
– Plumbing certificate of compliance
Defect Period
Upon completion of your build and reaching Practical Completion, you will have a 13 week minor maintenance period. This is for the builder to attend to minor defects that would have been listed during your Practical Completion walkthrough but don’t prevent you from moving into your new space.
What happens when your defect period ends?
There are statutory warranties on your build.
This means that should any issue arise with the works on your home, you may reach out to your builder and make a claim; within six years for major defects and within two years for other defects from the date of completion.
By providing photos and videos to the builder, they can then investigate and determine whether it relates to the builder/contractor’s workmanship and attend to the defect for you. Industry guidance materials like the Fair Trading Standards and Tolerances guide can assist in determining a defect.
Dispute Resolution
Open communication with your builder goes a long way to easily resolving defects without the need to take legal action. Generally, if a builder and/or the owner are concerned with defects at the home, the builder may arrange an independent inspection with an engineer or building inspector, this then allows an impartial view and you can then discuss any concerns with your builder to work with you on. Alternatively, if there is a communication breakdown, either you or the Builder can formally request for Fair Trading to assist in dispute resolution and in most cases the Inspector will arrange to meet with you and the builder on-site to inspect the work under dispute and act as a mediator and issue an order of rectification if it’s required. If your builder is no longer operating, then you can submit a claim through your Home Warranty.
32 Degrees Building Quality Assurance Program
32 Degrees Building cares about the quality and finish of your build. Our Quality Assurance Program ensures that throughout and at the end of the build a clear picture of the quality and completeness of the construction is achieved.
Our Quality Assurance Program includes a progress inspection and a final inspection which is undertaken by an independent building inspector. The inspections we conduct are as follows:
Progress Inspection: The building consultant will thoroughly inspect frames & trusses, cavity drainage and flashings, brickwork & thresholds at the lock-up and rough-in stage ahead of the plasterboard being installed.
Final Inspection: The building consultant will undertake a comprehensive inspection of all new internal and external areas ahead of handover and before the signoff of practical completion is reached.
These reports will highlight defects (if any) that require us to attend to and upon finalisation of the Progress Inspection and Final Inspection, a Certificate is issued confirming that all Quality Assurance requirements have been met.
The abovementioned inspections are conducted in addition to the principal certifying authority (PCA) inspections and engineering inspections and will as a whole ensure that the highest quality build has been provided to you at handover.
Why you need to move out for 2 weeks during the build
When building a Second Storey/First Floor Addition or Ground Floor Extension with 32 Degrees Building you must vacate the premises for a minimum period of two weeks.
Why do you need to vacate?
- We require you to vacate your home for the safety and comfort of your family. We want to ensure that your family are safe, comfortable and have the best possible experience during the build. With this in mind, we require that you vacate the premises for at least two weeks so that we can complete important tasks such as demolition, electrical work and preparation for the build. We want you to be able to avoid the noise, dust and disruption associated with this stage of the build.
- Another reason you are required to vacate is for the safety of our team. When building an addition or an extension we are working with an existing dwelling with existing electrical and structural aspects we need to take into consideration. With these aspects of the build to keep in mind, it is important for us to disconnect the power to the entire home for a two week period. This will minimise any safety issues or risks associated with this stage of the build and also keep our team and your family as safe and happy as possible.
We strive to make building an addition or extension a safe, seamless and as enjoyable a process as possible. With our extensive experience building additions and extensions, we know what works and what doesn’t work. With the safety and comfort of your family of the utmost importance to us, we structure our builds and our process around ensuring that you will have the best possible experience as your addition or extension is added to your home.
Should I Stay or Should I Go? Hot tips to help you survive your renovation
Tips for homeowners living through a renovation, extension or addition
Whether you stay or move, your large scale renovation, ground floor extension, or first floor addition can cause stress. Of course, stress is simply par for the course when building, and nearly everyone — regardless of whether they moved out or stayed put – experience some sort of challenge during the build. We’ve put together some tips to help you survive your renovation – whether you stay or go for the duration of the build;
If you decide to stay and live through the renovation, your number one priority is to preserve your sanity:
Before the renovation:
- Declutter. It will be easier for you to live with the essentials before you start the renovation.
- Stay far away from the work area to ensure you’re not in the builders’ and tradespeople’s way.
- Tackle the dust debacle by placing all essentials in one room that you will not renovate, cover them, then seal off the area.
- Take all your fragile items and store them far from the work area. If you are going to store them in boxes, don’t forget to label them as fragile.
- Prepare a lot of drop sheets, tarpaulins and blankets. You are going to need a lot of them to cover important furniture pieces and other items.
- Label every sealed storage box, so you know where to find the items you need. It is a hassle to move things around every time.
- Ensure you have made all of your decisions and finalised all of your selections BEFORE your build starts. This will take away the stress of feeling rushed to make decisions and ensure clarity when heading into the build. The last thing your builder wants is to work out variations during the build following a last-minute change of mind. Believe it or not, most builders’ would prefer not to have any variations during your build!
During the renovation:
- Be prepared; it is an emotional journey. Give the builder and their team breathing room to complete the build, communicate with them on their expected finish date and let them work towards it.
- There will be times when you will feel like everything is slow and one task is taking so much time. When this happens, try to relax – it could be simply due to the number of different trades required to be coordinated for 1 area, or the team is ahead of schedule or waiting on a delivery.
- If you have been provided with a timeline, generally, your builder should be on track or thereabouts. As long as they are still confident of achieving your end date, it’s not so important how each specific item progresses in between. If you are concerned, discuss the issue with your builder during a scheduled meeting.
- For large scale extensions and first floor additions
- Try to avoid unnecessary chats — the type that goes on for hours.
- If you have zero background in construction, do not be tempted to work alongside the builders and tradespeople. Let them deliver what is agreed in the quote. Also, you do not want to mess up, then pay extra to have it fixed.
- For better indoor air quality, turn off your air conditioning system.
- Always wear your shoes and slippers.
- Keep the kids and your pets away from the construction site at all times. If you have dogs, consider keeping them away for the duration of the build, as doors and gates can be left open, and the builder is not responsible for keeping an eye on them for you.
- Yes, the portaloo stinks. They are cleaned fortnightly, but it doesn’t take away the youthful nostalgia of festival toilets!
- Water ingress – it happens. Your builder will do everything in their power to prevent it; however, water can still work its way in during the initial construction stages of a large scale project. Don’t stress though, as your builder will make good the areas that are impacted – just communicate with your builder when this happens.
Based on experience, it is possible to stay in your home and live through a large scale renovation, ground floor extension or first floor addition, but expect changes in your daily routine, and sometimes you may be without water, electricity or internet. You also need to be extra careful to avoid accidents on site.
How to Decide Whether to Move Out or Live Through a First Floor Addition, Ground Floor Extension or Renovation?
Whether you are building a First Floor Addition, Ground Floor Extension or Renovation, the one question that our clients always ask us is can they stay in the home and live through construction or should they consider temporarily moving out? This is a big decision to make — with a lot of factors to consider other than your budget when entering into significant construction works to your home.
We have outlined below some of the factors to take into account when looking to stay or move.
Factor # 1 – Scope of works
 How much work is going to be done to your home? Are you doing a large scale renovation, ground floor extension or first floor addition? Are you renovating the kitchen and bathroom? These are two areas of your home that you often cannot live without for more than a few days. Is there going to be demolition? Are you renovating a completely isolated part of the house (e.g. second floor)? Can you live under the addition while being built?
These are the questions to consider when deciding whether to remain living in your home or move out and allow the builders to work their magic.
Keep in mind that construction is disruptive in nature. It can cause inconveniences and interrupt your daily routine. It is also possible that you will interfere with the builders and slow things down.
Therefore, if you are:
- Conducting a large scale renovation (50% of the house)
- Doing ground floor renovations including areas like the kitchen
- Doing a demolition
- Removing toxic materials (e.g. asbestos and mould growth)
- Removing and replacing the roof
- Doing a total kitchen and bathroom overhaul
You should consider moving out to make way for the builders who will work on your home.
Factor # 2 – Budget

Can you stretch your budget to be able to afford temporary accommodation?
Budget is often a major concern for many renovators or addition and extension builders. The truth is that both moving out and staying in will incur additional expenses.
If you are planning to move out, you must prepare for the costs of short-term renting.
To save money, you could stay in an Airbnb, or a cheaper hotel/motel, go on a budget vacation, or you could ask a friend or a relative if you can stay and live with them temporarily.
If you choose to stay amidst a large-scale renovation, ground floor extension or first floor addition be prepared to order takeaway and bottled drinking water. All these are going to add up to your expenses.
Factor # 3 – Basic cooking facilities and a working bathroom
 If you choose to live through the large-scale renovation, ground floor extension or first floor addition, you might need to set up a makeshift kitchen and a temporary dishwashing area. Cooking using your outdoor kitchen or BBQ is a great idea.
In general, a makeshift kitchen almost works for most builds, but it is going to be a huge adjustment for everyone with them. You should be prepared to be without a full working kitchen for a least 6 weeks.
Living through a large scale renovation, ground floor extension or first floor addition is also easier when you already have two bathrooms in the house, and one remains functional while the other is being renovated. Otherwise, you need to buy a portable toilet. If you are renovating both as part of your build, be prepared to pay more if you request for them to be renovated separately instead of at the same time as the builder will incur additional travel, labour, time and site costs.
Access to water is crucial too. If you’re staying, ask your builder about the times that they need to turn off the water supply so you can create a bathroom schedule and store clean water for cooking and doing chores.
Factor # 4 – Level of tolerance and patience
 Can you deal with the noise coming from jackhammers, electric saws, welding machines, dump trucks, cement mixers, cement cutters, tamping machines, sledgehammers, and drills as early as 7AM and as late as 6PM?
How about that fine gyprock dust that gets everywhere despite sealing up some parts of the house?
Can you deal with all the waste from the construction and scaffolding around your house?
Would you feel comfortable doing your daily routine with the builders and tradies walking around the house? Do you think they can do more when you’re not around?
There are the clients who can and the clients who can’t handle living through a construction zone! Which one are you? Based on experience, a lot of people commencing a large scale renovation, ground floor extension or first floor addition decide to move out in the middle of construction because they cannot bear the noise, dirt, and lack of privacy. Not having to live through the mess and chaos is a lifesaver, especially during these stressful times. You may also find you will be more excited with your new space when you move back in rather than living through the chaos to get to the end.
Factor # 5 – Length of the renovation
 When the large scale renovation, ground floor extension or first floor addition takes over your home for weeks or months, moving out is the ideal option. The builders work faster with you out of the way, which results in quicker turnaround times and more money saved on labour costs.
Factor # 6 – Who are you living with?
Most couples with no children decide to live through the renovation process, but only when smaller-scale work needs to be done.
But, if you are doing major building works and you have small children, teenagers, pets, and are living with elderly members of your family, consider moving out. It would help if you got out of the way so the builders would be able to get more done quickly.
Deciding to live through a large scale renovation, ground floor extension or first floor addition or to move out is a personal decision. It is up to you and your family to weigh up the pros and cons, depending on your situation. Assess the amount of work to be done and the time the builders need to finish construction. Once you know the scope of the project and the specifics of the construction and design, you’ll figure out where you will stay while the work is being done.
The most important thing is communication – confirm your selections and questions before your build commences and then allow your builder and their team breathing room to get stuck in and complete the project at hand.

Planning a Second Storey Addition, 8 Things to Consider Beforehand
More often than not, when you moved into your home, you didn’t prepare for any future life changes to happen that require you to extend your house either outward or upward. But here you are and what do you do? There are advantages to either option.
If your property still has room for a ground floor extension, then you can build out and keep everything on a single level, however, if your property is smaller and you would like to keep the backyard space then you should consider building a second storey addition. Doing so also means the least disruption to the existing house below and you can practically live at home throughout the extension project.
Before you decide to build a second floor addition or ground floor extension, there are some things to consider.
Thermal performance
This must be taken into consideration when creating house plans for a new addition to your home and should be well-integrated into existing sections of your house. A building sustainability assessment is required to ensure an extension meets the minimum sustainability benchmarks.
Ensuring thermal performance can be a simple as fine-tuning the size and orientation of your window or a bit complex as adding skylights or light tubes.
Insulation
All new constructions are required to be insulated to climate appropriate levels. This could mean existing insulation in the original building may have to be retrofitted to prevent leaks of any kind.
Heating and Cooling
It is possible that your existing HVAC system will become insufficient once the new addition is completed. Increased living space often means increased heating and cooling requirements. So you should take this into account when developing house plans and when estimating a budget. Don’t forget the amount of work and costs needed for the ductwork if you go for a ducted AC.
Roofing
The roof on your second floor addition should blend well with the rest of the house. Unless, of course, if you prefer the extension to stand out. But if you want a unified look, it is important that the roofing matches the existing one, even in the choice of Colorbond tin or tiles.
Cladding
Continuing with a unified look so that your addition or extension blends in you also need to consider your cladding options. Brickwork, weatherboard, hebel or render. To match existing, to change the entire façade or to use a mix of different materials are all possible to make your addition look like it has always been a part of the home.
Flooring
Should your second floor addition use the same type of flooring as the original building? The choice is really up to you. Different types would delineate the extension from the not, while similar types will ensure continuity and create the illusion of a bigger space.
Electricity
Depending on the size of the second-floor extension, 1 to 3 more circuits may have to be added to the electric panel. Not to mention, electrical lines that have to be added and integrated with the rest of the house.
Termite proofing
Protecting a home addition from termites should be a priority right from the start. This means choosing termite-resistant materials, adding termite barriers, treating timber products if you use them, or creating house plans that allow easy inspection access.
With these taken into account, it’s time to decide on what type of extension you want to build and the kind of materials to use.
At this stage, it is highly recommended that you consult with professional builders and designers. Tap into their knowledge of the best material to use or the most suitable design for the climate in your location. They, more than anyone, else have intimate knowledge in everything and anything building-related.
To book a consultation with the professionals, contact us.
Article written by: MyChronicles.net
What should you expect to pay before your build can start?
To fund an addition or extension on your home, you may find yourself applying for a Construction Loan with your lender. This is all well and good, however, you may find that the lender will not formally approve and release funds until plans, Council approval and a Contract is in place outlining the progress stage payments of the build. So, to get to this point, how much should you expect to outlay? The short answer is that we find for most of our clients it’s around $20-$25K to complete the preliminary stage – this is for preparation of all the documents required to start building.
Here at 32 Degrees Building we break it down into two manageable costs for our clients and below is an explanation of the preliminary process to help you as a client understand what happens before we can issue contracts and start your build:
Preliminary Phase 1: Design and development of your architectural plans
This is the start of your building journey with us. Here we coordinate a survey and engage the draftsperson to come out and meet with you. The draftsperson will talk you through your ideas, then design your initial concept plan to align to the quotation you have received. Usually, a few tweaks may be required and then you can sign off your concept plan and the full architectural drawings can be created ready for us to lodge for planning approval.
Preliminary Phase 2: Council Lodgement – Development Application & Construction Certificate OR Complying Development Consent
Once your plans are finalised (sitemap, elevations, shadow diagrams, floor plans etc..) the next step is where we will lodge your plans to Council or to a Private Certifier either as a Complying Development Consent OR as a Development Application and Construction Certificate
CDC or DA/CC fees will be advised once plans are developed and a Council fee quote can be provided. Here we obtain the additional relevant documentation needed in order for your build to be ready to start and this includes;
- Statement of Environmental Effects – Details the potential environmental impacts the proposed build will have.
- Waste Management Plan – Applies to all homes across Australia and explains how waste generated onsite will be managed, maintained and disposed of.
-
BASIX – The Building Sustainability Index applies to all residential homes across NSW and confirms the glazing and energy rating minimum that is required to comply to
-
Engineering plans and if a first floor addition a first floor certification to confirm your existing home will support the addition
- Hydraulic plan and certification – This is to confirm your stormwater connections and how we will connect to the existing or if there are upgrade to the existing needed
- Sydney Water check – To confirm that your build will not impact any of Sydney Waters assets
- Sewer Service Diagram – We obtain this for the plumber to see where the existing connections to the home are
- Long Service Levy – Applies to all residential works over $250K
- There may be additional supporting documents required (e.g. Bushfire Report, Flood Report, Acoustic Report etc…)
- and any other supporting documents as required
How long does this process take? Well, this all depends on the Council, the service providers and you as the client. We find that from planning to Council approval to issuing you with contracts can take around 3/4 months. Once your build cost and inclusions have been finalised and your HIA fixed price contract has been issued you can then provide these to your lender in order to finalise your finance approval.
If you haven’t built before or have no knowledge of the building and construction industry then preparing all of these documents can seem quite daunting. That’s why with us, you would have us as your main point of contact to do all of the hard work for you. We even liaise between yourself and the draftsperson to help you stay within your budget when developing your plans and address any of the questions you have about the build along the way.
To get started on your building journey with us, we ask you to download our packages or complete our pre-quote enquiry form and tell us what you would like to build, from there one of our team members will be in touch with you.